Introduction to Infrared Photography

Infrared, or “IR” photography, offers photographers of all abilities and budgets the opportunity to explore a new world – the world of the unseen. Why “unseen”? Because our eyes literally cannot see IR light, as it lies just beyond what is classified as the “visible” spectrum – that which human eyesight can detect. When we take photographs using infrared-equipped film or cameras, we are exposed to the world that can often look very different from that we are accustomed to seeing. Colors, textures, leaves and plants, human skin, and all other manner of objects can reflect IR light in unique and interesting ways, ones that cannot be mimicked with tools such as Photosho. Like any form of photography or art however, it is a matter of taste. I would strongly urge people to explore the world of IR. As the number of cameras-equipped devices proliferates and the associated technologies improve, IR photography may offer the opportunity for photographers to expand into new arenas and differentiate their offerings from those of others.

20160718

History Of Infrared Photography

The first forays into IR photography, using special film plates, began in the early part of the 20th century. During WWI, IR photography proved extremely valuable, as images using the IR spectrum were not affected as much by atmospheric haze as normal photos. IR images were also able to show stark distinctions between vegetation and buildings, better identifying potential enemy targets such as camouflaged munitions factories and other key sites. Rivers, streams, lakes, and other waterways were depicted in a very dark hue, making them much more obvious.

During the 1930s and 1940s, film makers introduced a variety of infrared sensitive films that attracted both amateur photographers and Hollywood filmmakers. The military extended its use of IR photography as well, as it sought every possible advantage during WWII. During the 1960s, IR photography saw a number of converts, as some of the leading musicians of the day, such as the Grateful Dead and Jimmy Hendrix, popularized its use via their psychedelic album covers. With the advent of the digital camera in the late 1990s, both regular and IR photography were about to change substantially. In addition to professional and amateur photographers, law enforcement officials rely on IR photography to detect forensic evidence not discerned through normal eyesight.

2016718

IR Light Qualities

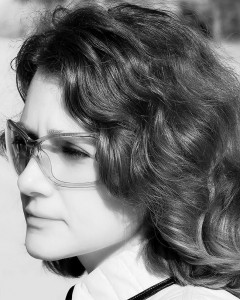
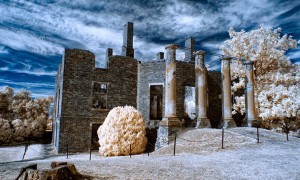
Reflected IR light produces a fascinating array of surreal effects. Vegetation appears white or near white. Skin takes on a very milky, smooth texture, although veins close to the skin surface can be accentuated and take on a rather ghoulish appearance. Eyes can appear a bit ghostly with the irises registering very dark tones and the whites of the eye taking on a grayish hue. Black clothing can appear gray or white depending on the fabric. IR light can pass through sunglasses that, to the eye, appear extremely dark or mirror-like (see image below). Blue skies take on a much more dramatic appearance as well.

The other aspect of IR photos is a bit tougher to describe and classify. I have found that there is a certain type of contrast, or what I refer to as “crispness”, rarely seen in normal photography. High contrast B&W images are the closest in nature to IR photography, but even those don’t seem to have the same look and feel as IR images. These effects and others are what provide the magic of IR photography – just about everything looks very different from what you are used to seeing within the visible light spectrum.

0718

IR Photography Options

35mm IR film is still readily available for as little as $11 for roll of 36 prints. It is easy enough to use in your existing SLR, thus enabling you to experiment with IR photography, without committing to anything more than a roll or two of film, and some development costs. Depending on your lab’s capabilities however, you may find that you have to ship the IR film to another lab that has the ability to process it, much as is required for high end B&W film.

Another alternative requires buying a circular IR filter (similar to a UV or circular polarizing filter) that attaches to the front of your camera lens. The IR filter prevents visible light from passing through while only allowing IR light to strike your camera’s sensor. These filters will vary in price depending on the size of the filter and the specific portion of the IR spectrum they address. The main difference between the filters is how colors are rendered (more on this in a bit), but this is primarily a matter of taste. Spending more money on a filter that focuses on a different part of the IR spectrum doesn’t necessarily guarantee that you will like the results more than an IR filter costing much less.

What are the downsides of using an IR filter that attaches to your infrared lens? The primary issue is motion blur. Since your DSLR has an IR blocking filter in front of it, very little, if any, IR light reaches it. The IR filter allows only IR light to reach your sensor while filtering out the visible light. The combination of the IR blocking filter and the IR filter on the front of your infrared lens requires very long exposure times. Since the IR filter is very dark, you also have to focus before attaching the IR filter to your infrared lens.

The last option is to have a DSLR converted for exclusive IR use. This is more costly, but it produces the best results and offers the most flexibility.

DSLRs Converted For Dedicated IR Photography

This option requires the IR blocking filter that sits in front of your DSLR’s sensor to be removed, and substituted with one that allows only IR light to be passed through. It is the equivalent of taking the external IR filter I previously described, and substituting it for the IR blocking filter. What are the benefits to this approach? You can use your DSLR just as you do today, relying on normal exposure values and shutter speeds. Looking over my IR photo metadata, I have found that on a typical sunny day from May through August, at f/8 and ISO 100, I achieved shutter speeds of at least 1/125 and often much higher. No long exposures, no time focusing and then needing to shift your focus mode from AF to manual, no fiddling with IR filters on the front of your infrared lens. Most importantly – no blurred images.

Capturing IR Images

Since the DSLR has been modified for IR only purposes, you can use it just as you did when photographing images within the visible light spectrum. ISO, shutter speed, and aperture combinations will work in conjunction with one another just as they do with any non-IR DSLR. Matrix metering is always a safe bet with IR, although you may want to experiment with your camera, infrared lens, and lighting conditions to determine if center-weighted metering provides better results in a given situation. My D40x required me to adjust the exposure compensation button at times, dialing up/down by as much as 1.7. Normally, the range of adjustment was smaller – +/- .3 – .7. Although I have the same IR filter on my D90 however, I have noticed that the D90 requires much less adjustment of the exposure compensation. This was likely a result of the D90 and D40X using different camera sensors. It takes a bit of trial and error to understand what a “good” RAW image looks like in your LCD. With time however, you will come to recognize when you have properly exposed an IR image and if you need to adjust the exposure compensation.

What About Infrared Lenses?

We are trained to believe that the best infrared lenses will produce the best results. However, in the world of IR, the lens that works best in the visible spectrum can be a complete dud in the world of IR. Conversely, lower cost infrared lenses may perform much better than their counterparts. The main flaws with poor IR performing infrared lenses are twofold; producing a hotspot in the center of the image (slightly different exposure and colors than the rest of the image), and being more susceptible to flare. You may minimize the appearance of the hotspot in post processing, but it can take quite a bit of work. And just as with flares associated with the visible light spectrum, IR flares cannot easily be fixed without extensive Photoshop work. Worse, IR flares are harder to detect. When photographing in the visible light spectrum, you can often tell when you are on the verge of introducing a flare based on the angle of the lens relative to the sun. With IR however, you don’t always receive the same visible cue, since you can’t see IR light. Thus it is important to check your LCD as you shoot IR to ensure that you are not introducing flares into your photos, since you cannot trust your eyes.

Processing IR Images

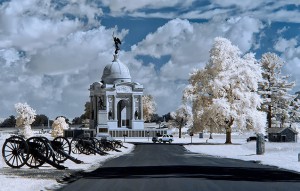
RAW files afford the most flexibility for post processing IR images, just as they do for photos taken with visible light. The RAW images viewed straight from the camera are not very impressive – dull, pinkish in color, lacking in contrast. RAW images from an infrared DSLR would likely not persuade many people to delve much deeper into this style of photography. The IR image below (Pennsylvania Memorial in Gettysburg, PA) possesses a decent contrast level, but others can appear more bland or “muddied”.

18

What gives it this pinkish tone? A number of factors influence the look of the RAW IR image – the specific DSLR sensor used, the IR filter installed on the DSLR by the IR conversion company, and software algorithms used for white balance top the list. IR images actually have no color to them, but your DSLR’s sensor has to assign something to the red, green, and blue sensors associated with the Bayer pattern. While each camera’s IR images will appear slightly different than those of others, most modern DSLRs will produce a RAW file that looks somewhat similar to the image above.

I process my IR images in Adobe Photoshop Lightroom, using a preset that serves as a good starting point for adjusting the white balance, tone, contrast, sharpening, etc. The most important of these settings is the white balance, which I set to a temperature of 2100 and a tint of -72. The resultant image looks like the one below. Now the image is shaping up and looks much better than the sea of pink from the original RAW file. Warning: Changing the white balance settings of IR images can result in some drastic psychedelic experiences!

Below is the final version, after some additional processing, noise reduction, and sharpening:

718

This article comes from photographylife edit released
Outdoor Thermal Network Camera Stabilizes Images

The latest from the network video surveillance product manufacturer is the Thermal Network Camera.

The bullet-style IP camera is engineered for 24/7 operation in adverse environmental conditions. It provides a means of turnkey outdoor detection in situations where intruder detection is critical.

Thermal cameras are not only reliable for round-the-clock detection, but they are also useful for verification to help distinguish between a real and false alarm. Thanks to its powerful processor, Thermal Network Camera is highly capable of running video analytics via the Camera Application Platform (ACAP). Together with our partners, customers can find a tailored surveillance solution that meets their specific needs.

We point out the camera delivers a 384 x 288 thermal resolution and it provides high levels of contrast for quality image reproduction. We also offers the camera with a choice of five lenses (7mm, 13mm, 19mm, 35mm and 60mm) to help dealers specify a security solution that meets their clients’ exact security needs.

In addition, the camera features our Zipstream technology that is said to optimize video streams in real time to preserve important image details while compressing static portions of the image that include white walls, vegetation and other elements to help maintain network bandwidth and the preservation of storage space.

This article comes from cepro edit released

Hand Held Thermal Binoculars

Highly sensitive, low power consuming thermal and low-light imaging sensors employed in lightweight, hand held optronic imaging systems used by commanders, forward observers, fire controllers and recon teams, facilitating better situational understanding, target location, coordination and control. These lightweight and compact hand held imagers combine several types of sensors, including cooled or uncooled thermal, video imagers for daylight or low-light level conditions, laser rangefinders, target marker or laser pointers. Additional equipment includes GPS, integrated map display and communications interfaces. Combined with miniature or lightweight laser designators, such devices are transformed into a ‘trigger’ employing remotely fired laser guided munitions.

Hand held thermal imagers from different makers were displayed. Systems included the MilCam series, Opus H, the Moskito from Vectoronix and various systems, currently employed by the US Army and Marine Corps.

‘Nebula’ used by the US Army was picked up by by the US Army Rapid Equipping Force to be shipped to US Forces in AFghanistan, to meet an urgent operational requirement.

It displayed the MilCAM series Recon III handheld thermal binoculars, providing situational awareness, assisting the tasks of targeting and surveillance. The company introduced two new Recon III models. The Ultra-light version weighs only 5 pounds (2.3 kg) and uses a large format (640×480) long wave VOx Microbolometer with new automatic digital image processor. It is powered by two Lithium D cells sustaining up to four fours of operation. Enhancing target discrimination in daylight operations, the new and compact Recon III Lite thermal binocular combines the same sensor used in the Ultralite model with high resolution (768×494) color video camera. Both sensors are fitted with x4 continuous zoom and can be presented on the system’s integral OLED display in a full screen or split screen format. This version can also accommodate an optional laser pointer and additional memory to store up to 100 JPEG images, or download images to an external device via a USB connection. The ‘Nebula’ thermal binocular sight displayed at AUSA 2008 by the US Army Rapid Equipping Force was shipped to the US Forces in Afghanistan, to meet an urgent operational requirement for improving night performance.

This article comes from defense-update edit released

Fusion Night Vision

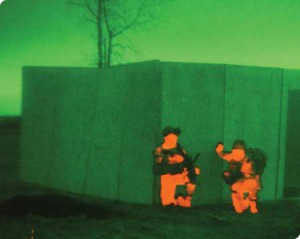
There is two technologies available for night time, low light and adverse weather conditions observation: Image Intensification and Infrared Thermal Imaging. Both have their own advantages as well as limitations. The special purpose of “QUADRO NVTF” system is to combine both technologies. It allows fully and effectively exploit their capabilities by creating “Hybrid” or so-called “fusion” observation system.

Night Vision

Modern Night Vision Devices are Small, Light Weight, & equipped with high performance/resolution image intensifier tubes. Increased photosensitivity, SNR & more recently auto gating provide the user with the capability to operate in even lower light situations than ever possible before. Additionally, today’s Night Vision Devices provide greater detail of people & objects, even on the darkest nights. When utilized with active Infrared Illuminators or Laser pointing aiming devices, the op-erator is still able to conduct observation tasks with effective recognition & scene assessment. However, not very effective if the person or object is concealed behind light bush, in a shadow or camouflaged. A sce-nario such as this highlights the vulnerability of the Image Intensification technology.

Thermal Imaging

Today’s Thermal Imaging Devices are Small, Light Weight & equipped with high performance engines (cores). Combined with superb resolution mini-displays, provide the operator with high resolution, high sensitivity imaging and detection range . Thermal Imagers provide detection of people’s & object’s heat signatures even if hidden behind thin bush, in a shadow or camouflaged. Thermal Imagers also have the additional benefit of operating during day & night and are furthermore able to see through smoke or fog . However, not very effective as only provides heat (infrared) ‘signatures’ of people or objects – provides no target detail , therefore results in very ineffective target recognition and scene assessment.

20160713Years of Research & Development paid off! Team of our engineers designed and created unique “hybrid” or “fusion” system which allows fully and effectively exploit both Night Vision and Thermal Imaging technologies simultaneously. It called thermal night vision. Requires minimum training and little familiarization to acknowledge how to operate with the system to reach maximum effect and stay in FULL control of the situation.

This article comes from nightvision edit released

Introduces Muon calibrated thermal imaging core

It has introduced its latest thermal imaging core, Muon, which is designed specifically for volume OEMs capable of integrating uncooled FPAs into their own camera solutions.

It said that it has simplified the OEM process by offering a thermal subassembly that generates calibrated CMOS video-out using industry-standard interfaces. Because Muon is calibrated for TEC-less operation, OEMs no longer have to develop their own elaborate factory calibration equipment or processes. Muon is a thermal ‘engine’ developed to operate on standard imaging device power and communication protocols.

Muon is based on Flir’s 17µ pitch vandium oxide (VOx) 640 x 512 or 336 x 256 FPAs and offers frame rates of 9Hz and up to 60Hz. Optimised for size, weight and power (SWaP), Muon has a form factor of 22 x 22 x 6mm and a mass of less than 5g and, depending on the configuration, uses less than 300mW of power.

According to the company, Muon is ideal for OEM manufacturers who are intent on using their own image processing, packaging and optical technologies.

This article comes from theengineer edit released

Wide Angle Infrared Smart Lens

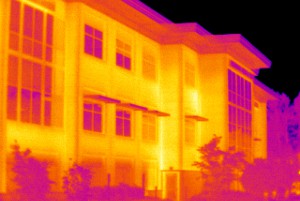
When working in a tight space, get a wide field of view that lets you see a larger target from a close distance. See an entire bank of switchgear cabinets in tight quarters, or see more components through an IR window. View the entire side of a building without getting too far away, or inspect roofs quicker than with a standard infrared lens by viewing a much larger area at a time.

Avoid the hassle of sending in your camera to calibrate with the infrared lens — with smart infrared lenses you can just attach the infrared lens to any compatible camera and start taking images.

Made of 100 % diamond-turned germanium with an engineered coating, the most efficient available material to transmit energy to the detector.

20160711

This article comes from fluke edit released

Thermal network cameras Reliable detection – 24 hours a day, seven days a week

Thermal network cameras outperform a visual camera in dark scenes and are a great tool for detecting people and objects in 24/7 surveillance, from pitch dark areas to a sunlit parking lot.

Thermal network cameras create images based on the heat that always radiates from any object, vehicle or person.

A thermal camera is less sensitive to problems with light conditions, such as shadows, backlight, darkness and even camouflaged objects; and delivers images that allow operators to detect and act on suspicious activity – 24 hours a day, seven days a week.

24-hour detection

Thermal cameras are excellent for detecting people, objects and incidents from pitch dark to sunlit and other challenging conditions. Thermal cameras do not, however, deliver images that allow reliable identification – that is why thermal cameras and conventional cameras complement and support each other in a surveillance installation.

Thermal cameras do not require any additional light sources – conventional or IR – that consume energy, create shadows and reveal their locations. And, in contrast to conventional day-and-night cameras that depend on a certain amount of near-infrared light to function, thermal cameras deliver reliable surveillance images even in complete darkness.

Enhancing any professional IP-Surveillance system

Thermal cameras can handle many difficult weather conditions better than conventional cameras, e.g. allowing operators to see through smoke, haze and dust. Thermal cameras typically also provide better accuracy in intelligent video applications.

With affordable IP-based thermal network cameras, thermal imaging is a realistic option for enhancing any professional IP-Surveillance system.

Benefits

Thermal network cameras are ideal for intelligent video and typically offer higher accuracy in analytics than conventional cameras, because they are less sensitive to light conditions.

This article comes from axis edit released

Military Thermal Imaging Binoculars

20160707

Thermal Imaging Binoculars – a medium-range Military Specification handheld thermal imager for military and civilian applications including special forces, search & rescue, police, border security, target acquisition, counter drug operations, park rangers monitoring wildlife/illegal game hunters, VIP protection and for general situational awareness. Thermal Imaging Binoculars will detect a man at over 2 kilometres. Two models are available: Thermal Imaging Binoculars (Medium Range) is based on a 384×288 25µ pitch detector.

Waterproof – Rugged – Reliable

Thermal Imaging Binoculars’s ergonomic clamshell design with rubber over-moulding is waterproof, floats and protects the camera in the harshest of environments and allows operation with or without gloves. The combination of Thermal Imaging Binoculars’s class-leading thermal imaging core and high-end germanium 75mm lens with diamond-like coating delivers the sharpest imagery in a supertough package. Functions include electronic focus & digital zoom, edge detection, Digital Magnetic Compass, GPS, external video output and up to 8 hours operation in normal use from 4 x AA rechargeable batteries.

This article comes from thermoteknix edit released

Thermal Night Vision vs Thermal Optics – What is the Ideal Setup?

This month, I want to address a question that we get several times a day: 20160706What is the ideal setup for hunting?

The answer is going to greatly depend on the type of hunting you intend to do. Thermal Night Vision (Image Intensifiers) and Thermal have different performance capabilities. Night vision is better for identification while thermal is better for detection.

On their own, they work great, but in tandem, they are unstoppable. Before we get carried away, keep in mind that I am addressing an ideal setup.

Yes, this gear is expensive and buying everything at once is not in most people’s budget. But, this is an article about the gear to look at over the course of several years or as you can afford it.

The ideal setup for a hunter will actually cross over into the ideal setup for those in law enforcement, military, and SOF. I like to keep my thermal night vision on my head; hands free and always ready. This allows me to easily patrol in the field, walk, run, climb, negotiate obstacles, etc. Since it is on my head, I don’t have to keep my weapon shouldered in order to use my thermal night vision.

My weapon will have an infrared laser attached. Night vision goggles are strictly observation tools. The laser is the aiming device.

You should not be deploying a firearm under goggles if you don’t have a laser. It won’t be fast or ideal.

The head-mounted thermal night vision goggle gives you the ability to clearly see and understand your surroundings.

A lot of guys ask about head-mounting a thermal imager. I am not fan of this. Thermal sees in absolute contrast. Most of the thermal imagers available on the civilian market are not going to provide the detail or be able to distinguish terrain features and variations as well as a thermal night vision device.

Sure, some thermals can accomplish this, but they are few and far between. Even then, walking around with thermal on your head is a good way to turn your ankle, fall down a hill, or trip over a tree root. If you don’t hurt yourself, you’re at least going to look like an ass clown in front of your buddies!

I suggest having a separate thermal imager. Proper patrolling; whether hunting or war-fighting is to move a certain distance and then stop, look, listen, smell. Rinse and repeat. During the intervals, you will use the thermal to scan for potential threats or targets.

Since thermal excels at detection, this is the perfect use. And, now that more affordable thermal weapon scopes are becoming available, you can slap one of these on your rifle and immediately engage a target if you come across something close by. If nothing is around, flip your goggle back down and continue on the patrol/hunt.

Using thermal night vision and thermal imagers in conjunction insures you have all your bases covered. You can effectively move, scan, detect, identify, and engage. Obviously, this technology does not replace good field craft, but it certainly gives you as much of an edge as you can get.

This article comes from ammoland edid released

Thermal Imaging Cores and Payloads

Thermal imaging is the preferred technology for detecting objects at night. Thermal imaging cores cameras are able to detect an object’s infrared radiation and create an electronic image. Normally, warm bodies (such as persons and vehicles) are readily visible because they are warmer than a typical cold background. Since they do not rely on reflected ambient light, thermal imagers are light-level independent. In addition, they also are able to penetrate some obscurants such as smoke, fog and haze.

Incorporating an advanced 640×480 microbolometer detector array, the SmartCor640 Uncooled Infrared Camera delivers high resolution infrared images in the long-wave (8-14µm) spectral range. Because they accept a variety of infrared objective lenses and with either Gigabit Ethernet or Camera Link digital video output models, the cameras are ideal for a wide variety of applications. In addition, the SmartCor640’s short thermal time constant produces superior thermal image quality even while imaging fast moving objects.

The Thermal Imaging Cores Camera incorporates a ULIS advanced all silicon 1024×768 microbolometer detector array and state-of-the-art 17 micron pixel pitch technology to deliver extremely high resolution in an XGA format. Because of the camera’s small compact size and low power consumption, it is easy to integrate, and ideally suited for a wide range of military and COTS themal imaging systems. It is short thermal time constant produces superior thermal image quality, even while imaging fast moving objects, making the system an ideal choice for handheld, ground vehicle and airborne EOIR platforms and advanced fusion-based night vision systems.

This article comes from nightvisioncameras edit released