Infrared, or “IR” photography, offers photographers of all abilities and budgets the opportunity to explore a new world – the world of the unseen. Why “unseen”? Because our eyes literally cannot see IR light, as it lies just beyond what is classified as the “visible” spectrum – that which human eyesight can detect. When we take photographs using infrared-equipped film or cameras, we are exposed to the world that can often look very different from that we are accustomed to seeing. Colors, textures, leaves and plants, human skin, and all other manner of objects can reflect IR light in unique and interesting ways, ones that cannot be mimicked with tools such as Photosho. Like any form of photography or art however, it is a matter of taste. I would strongly urge people to explore the world of IR. As the number of cameras-equipped devices proliferates and the associated technologies improve, IR photography may offer the opportunity for photographers to expand into new arenas and differentiate their offerings from those of others.
History Of Infrared Photography
The first forays into IR photography, using special film plates, began in the early part of the 20th century. During WWI, IR photography proved extremely valuable, as images using the IR spectrum were not affected as much by atmospheric haze as normal photos. IR images were also able to show stark distinctions between vegetation and buildings, better identifying potential enemy targets such as camouflaged munitions factories and other key sites. Rivers, streams, lakes, and other waterways were depicted in a very dark hue, making them much more obvious.
During the 1930s and 1940s, film makers introduced a variety of infrared sensitive films that attracted both amateur photographers and Hollywood filmmakers. The military extended its use of IR photography as well, as it sought every possible advantage during WWII. During the 1960s, IR photography saw a number of converts, as some of the leading musicians of the day, such as the Grateful Dead and Jimmy Hendrix, popularized its use via their psychedelic album covers. With the advent of the digital camera in the late 1990s, both regular and IR photography were about to change substantially. In addition to professional and amateur photographers, law enforcement officials rely on IR photography to detect forensic evidence not discerned through normal eyesight.

IR Light Qualities
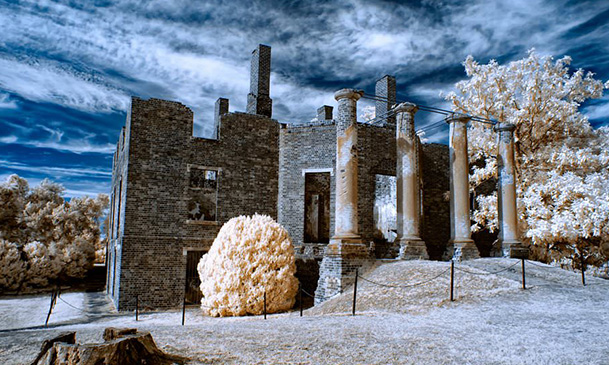
Reflected IR light produces a fascinating array of surreal effects. Vegetation appears white or near white. Skin takes on a very milky, smooth texture, although veins close to the skin surface can be accentuated and take on a rather ghoulish appearance. Eyes can appear a bit ghostly with the irises registering very dark tones and the whites of the eye taking on a grayish hue. Black clothing can appear gray or white depending on the fabric. IR light can pass through sunglasses that, to the eye, appear extremely dark or mirror-like (see image below). Blue skies take on a much more dramatic appearance as well.
The other aspect of IR photos is a bit tougher to describe and classify. I have found that there is a certain type of contrast, or what I refer to as “crispness”, rarely seen in normal photography. High contrast B&W images are the closest in nature to IR photography, but even those don’t seem to have the same look and feel as IR images. These effects and others are what provide the magic of IR photography – just about everything looks very different from what you are used to seeing within the visible light spectrum.

IR Photography Options
35mm IR film is still readily available for as little as $11 for roll of 36 prints. It is easy enough to use in your existing SLR, thus enabling you to experiment with IR photography, without committing to anything more than a roll or two of film, and some development costs. Depending on your lab’s capabilities however, you may find that you have to ship the IR film to another lab that has the ability to process it, much as is required for high end B&W film.
Another alternative requires buying a circular IR filter (similar to a UV or circular polarizing filter) that attaches to the front of your camera lens. The IR filter prevents visible light from passing through while only allowing IR light to strike your camera’s sensor. These filters will vary in price depending on the size of the filter and the specific portion of the IR spectrum they address. The main difference between the filters is how colors are rendered (more on this in a bit), but this is primarily a matter of taste. Spending more money on a filter that focuses on a different part of the IR spectrum doesn’t necessarily guarantee that you will like the results more than an IR filter costing much less.
What are the downsides of using an IR filter that attaches to your infrared lens? The primary issue is motion blur. Since your DSLR has an IR blocking filter in front of it, very little, if any, IR light reaches it. The IR filter allows only IR light to reach your sensor while filtering out the visible light. The combination of the IR blocking filter and the IR filter on the front of your infrared lens requires very long exposure times. Since the IR filter is very dark, you also have to focus before attaching the IR filter to your infrared lens.
The last option is to have a DSLR converted for exclusive IR use. This is more costly, but it produces the best results and offers the most flexibility.
DSLRs Converted For Dedicated IR Photography
This option requires the IR blocking filter that sits in front of your DSLR’s sensor to be removed, and substituted with one that allows only IR light to be passed through. It is the equivalent of taking the external IR filter I previously described, and substituting it for the IR blocking filter. What are the benefits to this approach? You can use your DSLR just as you do today, relying on normal exposure values and shutter speeds. Looking over my IR photo metadata, I have found that on a typical sunny day from May through August, at f/8 and ISO 100, I achieved shutter speeds of at least 1/125 and often much higher. No long exposures, no time focusing and then needing to shift your focus mode from AF to manual, no fiddling with IR filters on the front of your infrared lens. Most importantly – no blurred images.
Capturing IR Images
Since the DSLR has been modified for IR only purposes, you can use it just as you did when photographing images within the visible light spectrum. ISO, shutter speed, and aperture combinations will work in conjunction with one another just as they do with any non-IR DSLR. Matrix metering is always a safe bet with IR, although you may want to experiment with your camera, infrared lens, and lighting conditions to determine if center-weighted metering provides better results in a given situation. My D40x required me to adjust the exposure compensation button at times, dialing up/down by as much as 1.7. Normally, the range of adjustment was smaller – +/- .3 – .7. Although I have the same IR filter on my D90 however, I have noticed that the D90 requires much less adjustment of the exposure compensation. This was likely a result of the D90 and D40X using different camera sensors. It takes a bit of trial and error to understand what a “good” RAW image looks like in your LCD. With time however, you will come to recognize when you have properly exposed an IR image and if you need to adjust the exposure compensation.
What About Infrared Lenses?
We are trained to believe that the best infrared lenses will produce the best results. However, in the world of IR, the lens that works best in the visible spectrum can be a complete dud in the world of IR. Conversely, lower cost infrared lenses may perform much better than their counterparts. The main flaws with poor IR performing infrared lenses are twofold; producing a hotspot in the center of the image (slightly different exposure and colors than the rest of the image), and being more susceptible to flare. You may minimize the appearance of the hotspot in post processing, but it can take quite a bit of work. And just as with flares associated with the visible light spectrum, IR flares cannot easily be fixed without extensive Photoshop work. Worse, IR flares are harder to detect. When photographing in the visible light spectrum, you can often tell when you are on the verge of introducing a flare based on the angle of the lens relative to the sun. With IR however, you don’t always receive the same visible cue, since you can’t see IR light. Thus it is important to check your LCD as you shoot IR to ensure that you are not introducing flares into your photos, since you cannot trust your eyes.
Processing IR Images
RAW files afford the most flexibility for post processing IR images, just as they do for photos taken with visible light. The RAW images viewed straight from the camera are not very impressive – dull, pinkish in color, lacking in contrast. RAW images from an infrared DSLR would likely not persuade many people to delve much deeper into this style of photography. The IR image below (Pennsylvania Memorial in Gettysburg, PA) possesses a decent contrast level, but others can appear more bland or “muddied”.

What gives it this pinkish tone? A number of factors influence the look of the RAW IR image – the specific DSLR sensor used, the IR filter installed on the DSLR by the IR conversion company, and software algorithms used for white balance top the list. IR images actually have no color to them, but your DSLR’s sensor has to assign something to the red, green, and blue sensors associated with the Bayer pattern. While each camera’s IR images will appear slightly different than those of others, most modern DSLRs will produce a RAW file that looks somewhat similar to the image above.
I process my IR images in Adobe Photoshop Lightroom, using a preset that serves as a good starting point for adjusting the white balance, tone, contrast, sharpening, etc. The most important of these settings is the white balance, which I set to a temperature of 2100 and a tint of -72. The resultant image looks like the one below. Now the image is shaping up and looks much better than the sea of pink from the original RAW file. Warning: Changing the white balance settings of IR images can result in some drastic psychedelic experiences!
Below is the final version, after some additional processing, noise reduction, and sharpening:

This article comes from photographylife edit released